As music production evolves, so do the techniques and tricks used by producers. Whether you’re a seasoned veteran or just starting out, these production tricks can take your music to the next level. In this article, we’ll explore ten essential production tricks that have changed the way we approach production.
Layering Sounds for Depth and Texture:
Layering involves stacking multiple sounds or instruments to create a richer and more complex sonic texture. It can be achieved by combining different synth patches, recording multiple takes of the same instrument, or blending samples. Get creative with it. Layer samples that are so different that they probably shouldn’t go together. Layer instruments that are almost identical. Cut all the lows in one track and cut all the highs in the other. Layer an organic sound with a digital sound. This is such an underutilized trick that almost always results in sounds that have never been heard before.
- Example: In a dance track, layering multiple drum samples (kick, snare, clap) can create a punchier and more dynamic rhythm section. Additionally, layering ambient textures underneath a lead melody can add depth and atmosphere to a chillout or ambient track.

Utilizing Sidechain Compression:
- Sidechain compression involves using the audio signal from one track to control the compression of another track. It’s commonly used in dance music to create the pumping effect where the volume of a pad or bassline ducks in time with the kick drum. It’s also used in mixes of all genres to cut out room in the low end of the mix for the kick to punch through. You can side chain the bass to the kick drum so to “glue” them together, or you can side chain more parts of the mix to really give the kick some punch. And don’t stop there, you can sidechain anything to anything. If you want an automatic sidechain plugin that sidechains any track to the bpm of the song, check out Nicky Romero’s Kickstart here.Try sidechaining a reverb to the dry track. This quiets the reverb while the main track is playing, then lets it get bigger while it’s quiet. It gives a really interesting kind of vacuum effect — especially on vocals.
- Example: In a house music production, sidechain compression can be applied to the bassline, causing it to momentarily decrease in volume every time the kick drum hits. This technique ensures that the kick drum cuts through the mix, providing a solid groove for the track.

Look for the sidechain drop down on the top right, this is the track you’re sidechaining your signal to. Adjust accordingly.
Embracing Creative Sampling:
- Sampling, as we all know it, involves taking a snippet of audio from one source and incorporating it into your track. Creative sampling involves using unconventional sources such as field recordings, old vinyl records, or even everyday objects to create unique sounds. There’s no limit to what can be processed into a sample, and the more you think outside the box, the more interesting your results will be. Sample the sound outside your window, sample your washing machine, sample the sound of filling a glass with water, get creative. Then take it and put a ton of effects on it until it’s unrecognizable. Once you have a completely new sound, tone it back until you have something that’s unique and fun to listen to. Check out Loopmasters for a huge library of samples.
- Example: In a lo-fi hip-hop track, creative sampling might involve chopping up old jazz records or spoken word samples and incorporating them into the beat. These samples add character and nostalgia to the track, giving it a distinctive vibe.
Applying Parallel Processing:
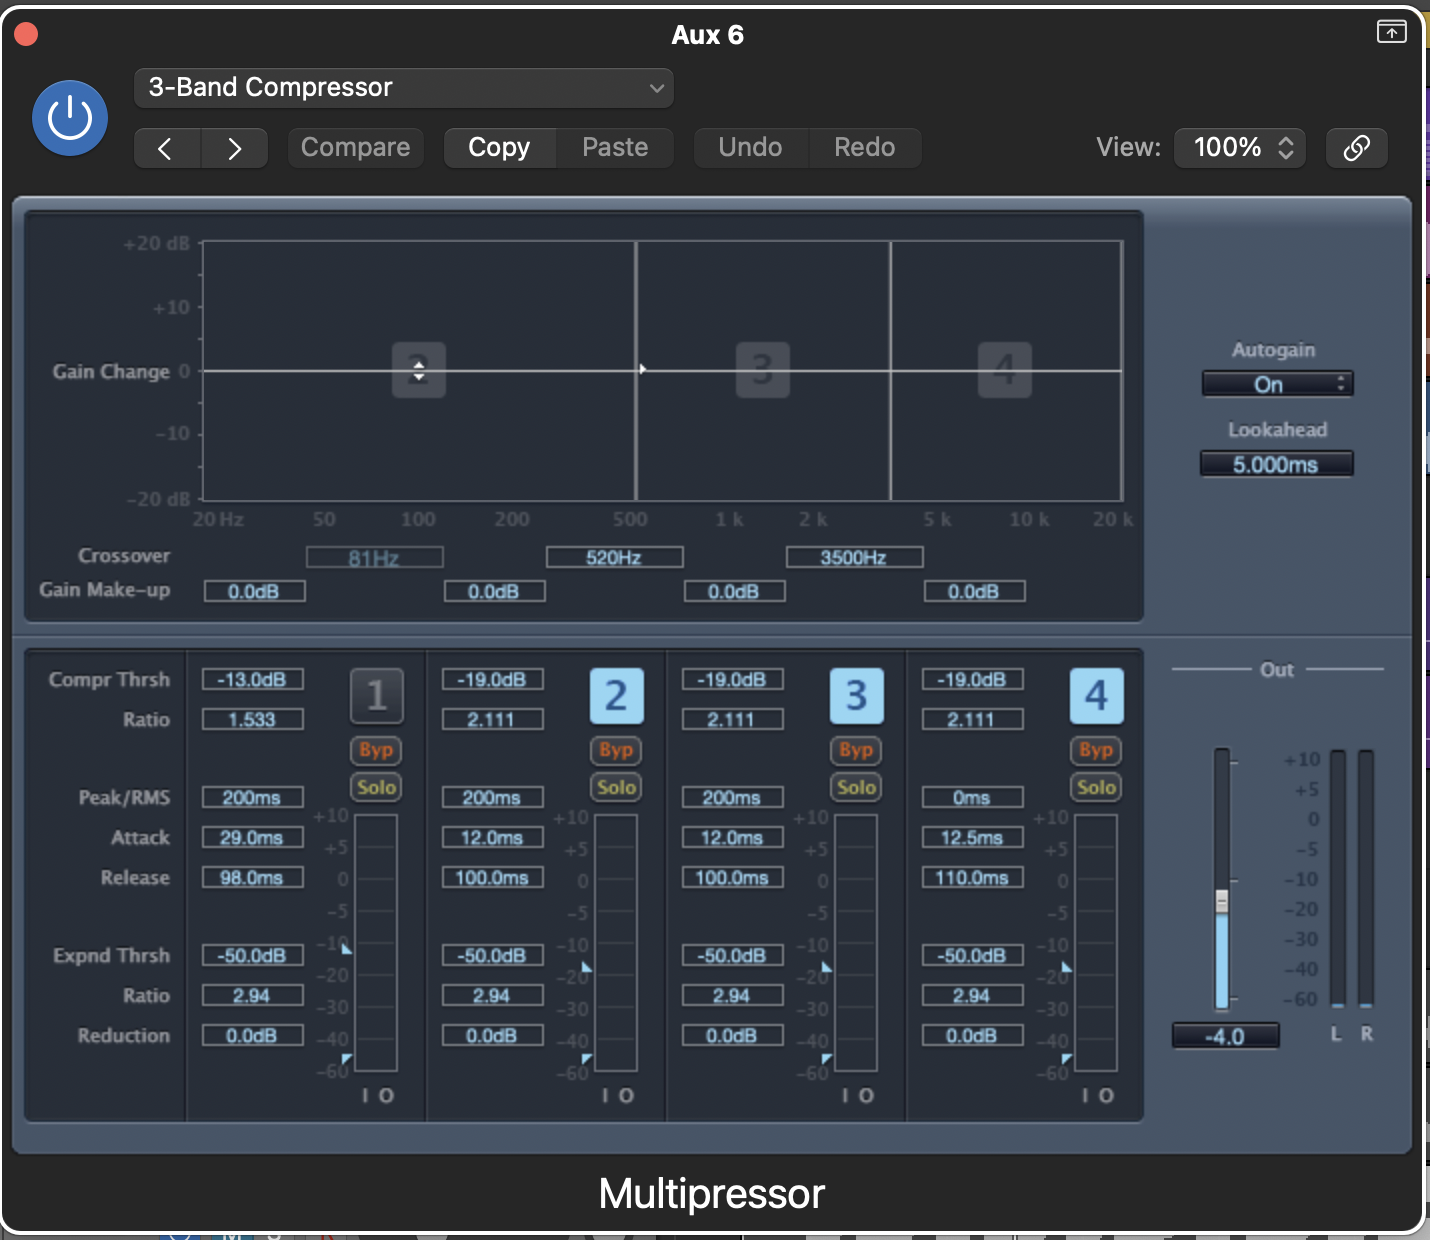
- Parallel processing involves blending a heavily processed version of a sound with the original sound to add depth and impact. Common parallel processing techniques include parallel compression, parallel distortion, and parallel saturation. This technique brightens up your sounds and gives them more presence in the mix. When I was first starting out, this term was intimidating to me. It sounds much more serious than it really is. In reality, all you’re doing is putting an effect on a bus. So long as you know how to use busses on your DAW (if you don’t, there’s a great article about it here) then you’re good to go, and chances are you’ve already been doing it. Parallel compression is a great way to get sounds to really come alive, just don’t overdo it.
Use a multipressor for the biggest sonic gains.
- Example: In a rock production, parallel compression can be applied to the drum bus to add punch and weight to the drums without sacrificing the natural dynamics of the performance. By blending the compressed signal with the dry signal, you can achieve a more powerful drum sound.
Experimenting with Automation:
- Automation involves dynamically adjusting parameters such as volume, panning, and effects settings over time. It adds movement and expression to your tracks, keeping listeners engaged from start to finish, and making those little details sound amazing in headphones. This tends to be a meticulous, “final touches” part of production. It’s much easier to add automation when you have a complete understanding of where the song is going and what each part is doing. If you have a part that builds, add reverb and then take it away just before the climax. If you have a repetitive part, try messing with the volume and timing on a phaser or flanger to add some texture. There’s really no limit to what could.
One of my favorite pieces of advice I heard was to make the stereo image of the whole track less wide over time—very slowly, otherwise it’ll be noticeable—then at the climax of the song, reintroduce the stereo image. It makes choruses sound enormous.
It may seem like an afterthought, but all of your favorite songs have some automation keeping you engaged and interested in the mix.
Example: In an electronic music production, automation can be used to create build-ups and breakdowns by gradually increasing or decreasing the filter cutoff frequency of a synth or gradually adding reverb to a vocal track. This builds tension and excitement, leading to a satisfying climax in the track.
Harnessing the Power of Reverb and Delay:
Details: Reverb and delay are time-based effects that can transform the spatial characteristics of your sounds. Reverb adds a sense of space and depth, while delay creates echoes and repeats. You know these. Really dial them in. Make sure they’re saying exactly what you want them to say. Tweak your reverb until it fits with your other instruments. Make your reverb fit with the BPM of the song. Find the right delay setting where the instrument becomes more than the sum of its parts. You’re familiar with them already, but they’re really the producer’s bread and butter, and there’s always more to learn. Some of the most expensive guitar pedals are reverbs for a reason—when it’s good, it’s a game changer. I recommend Valhalla Vintage Verb if you want a really great reverb VST. Check it out here. I use it on every project. If you’ve got a bigger budget, check out the industry standard: FabFilter Pro-R 2. For some more options, check out our list of The 5 Best Reverb Plugins of 2024
Example: In a cinematic production, reverb can be used to create the illusion of a vast and immersive environment, such as a cathedral or a cavern. Delay can be used to add movement and rhythm to percussion elements, creating a sense of anticipation and excitement.

It sounds incredible and it looks cool. I mean c’mon.

Understanding Frequency Masking:
Frequency masking occurs when two or more sounds occupy the same frequency range, resulting in a loss of clarity and definition in the mix. It can be addressed through EQ adjustments or sound selection. When just starting out, it’s often hard to figure out what’s wrong with your mix. It clicked when I realized you have to really listen. Mess with the EQ until you figure out what frequencies are standing out more than others, and turn those down—remember that EQ is used for turning bad frequencies down not for turning good frequencies up. Cut some of your harsh frequencies, then turn it up a bit and see what’s standing out. It’s also helpful to match EQ. If you don’t have a match EQ plugin, then listen to a song you like for a few minutes, then listen to your song again. Compare where your mix feels too harsh or too soft, and adjust it until it sounds similar (make sure to do this with songs of a similar genre to yours). Check out our list of The 5 Best EQ Plugins of 2024 for some strong options. TL:DR our favorite is FabFilter Pro-Q 3.
Oftentimes, the low end is too crowded, and all you need is a high pass filter on all of your instruments other than the bass and drums. Ba-da-bing ba-da-boom, your mix is 20% better.
Example: In a dense mix with multiple layers of synths and instruments, frequency masking can occur, causing certain elements to get lost in the mix. By using EQ to carve out space for each instrument in the frequency spectrum, you can ensure that each element remains clear and distinct.’

Most EQs are going to look something like this—accentuating some parts and removing others. This is for a drum bus.
Implementing Stereo Imaging Techniques:
Stereo imaging techniques allow you to manipulate the stereo width of your sounds, creating a sense of space and separation in the mix. Techniques include stereo widening, mid/side processing, and stereo panning. Double tracking instruments and panning one to the left and one to the right is a tried-and-true stereo trick. It’s been done since stereo was invented, and it won’t ever stop being a useful trick.
For a more modern take, try duplicating a track and offsetting them very slightly. This tricks your brain into imagining that the delayed sound is bouncing off of a wall very quickly, and hitting your ear just a bit later, kind of giving it a reverb effect. If you use Logic Pro X, try using the “Sample Delay” plugin in stereo, and turn the left or right track up by 200 or so, and you’ll notice a difference immediately. Adjust to your liking. This is one of my favorite tips of all time.
Example: In a pop production, stereo imaging can be used to create a sense of depth and dimension in the mix. For example, widening the stereo image of background vocals can make them feel more expansive and enveloping, while panning percussive elements can create a sense of movement and excitement.

This is what your plugin should look like for some gentle Sample Delay stereo imaging.
Incorporating Dynamic Range Compression:
Dynamic range compression is a tool for controlling the dynamics of your mix by reducing the difference between the loudest and softest parts. It can be applied to individual tracks or the master bus. You’ve heard it before. Maybe you know it well, maybe you’re just confused by it as I was for years. What is compression? Compression makes the soft sounds louder and the loud sounds softer. Imagine you’re taking this dynamic sound with a lot of peaks and valleys and you’re squeezing the sound through a small space, making the peaks and valleys less dramatic. Make sense? Kind of? What helped me really get it was just using it all the time. It’s almost always useful, and almost always gives a mix a more professional sound. There’s a lot of knobs on a compressor plugin, but when starting out, just make sure your dB level is low enough that you’re actually effecting the sound, (this essentially means what dB your sound has to get to before the compressor starts reacting—if your dB level is too high, then your sound will never hit that threshold, and thus won’t be effected by the compressor which means a lot of turning knobs and not a lot happening) then start messing with the other knobs and see what happens. Tweak until it sounds good, and just try to make every track sound just a little bit better.
Example: In a jazz recording, dynamic range compression can be used to tame the peaks of an expressive saxophone solo, ensuring that it sits consistently in the mix without clipping or becoming too overpowering. Similarly, on the master bus, compression can be used to glue the mix together and make it sound more cohesive.

Check out where the threshold is at: -20dB for a reasonable amount of side chain in this case.
Trusting Your Ears and Embracing Creativity:
Ultimately, the most important production trick is to trust your ears and embrace your creativity. Technical knowledge and production techniques are valuable, but intuition and artistic expression are equally essential. Just have fun with it. It’s not rocket science, and if you’re not having fun listening, then your mix isn’t gonna sound good. There’s a lot of terms and concepts and tools, but none of them are that serious, so just mess around and see what happens. Turn all your knobs up to 100%, over-compress your master, add too much reverb to every track. It really doesn’t matter, you’re just trying to make the song sound cool by whatever means possible. In any genre or style of music, trusting your ears means being open to experimentation and taking risks. It means being willing to try unconventional techniques, break the rules, and push the boundaries of your creativity to create music that is truly unique and memorable.
Mastering these ten production tricks can help you elevate your music production skills and create tracks that stand out in a crowded landscape. Whether you’re producing electronic dance music, hip-hop beats, or cinematic soundscapes, incorporating these techniques into your workflow can unlock new possibilities and help you realize your artistic vision. So, roll up your sleeves, dive into your DAW, and start experimenting – the world is waiting to hear what you create.


